
Good evening, I have made this lovely tri-fold card and have only just managed to write up my blog for it. I hope you enjoy watching the tutorial, it is 37 minutes long as I literally just made the card off the cuff – so if you have a spare half hour, grab a cuppa and enjoy the video 🙂 (probably tomorrow now before you see this :))
Now this project I made using the Spring/Summer 2019 Catalogue Needle and Nook DSP, Blackberry Bliss Cardstock and Co-ordinating ink and incorporated use of my stitched labels framelit dies! Oh oh and some velum.
I have linked these items below should you wish to get your crafty hands on them 🙂 The links will take you straight to my Stampin’ Up! Shop Page 🙂 Please remember that you will qualify for FREE products for each £45 spent on goods before shipping charges apply!:)
Please also note that as a thank you to all of my followers I will refund half of your shipping costs for any order over £45 before P&P is applied! This is limited to a set amount of customer orders so if you want a wee bargain – why not shop now? x
Instructions (Card Front):

- Cut Blackberry Bliss Carstock down to 11.5″ x 4.1 ” to make card base
- Score at 5 3/4″
- Score one half down to 2 7/8″ or fold in half – burnish well
- Cut a further piece of Blackberry bliss to 4.1″ x 5 3/4″ to make the front panel of your card and apply to your card base (see tutorial or image above)
- Cut your Petal Pink Card Stock to to 4 ” x 5 5/8″ and adhere to card front panel
- Cut your DSP to 3 7/8″ ” x 5 4/8″ and adhere to petal pink layer
- Using your Banner Punch punch a piece of Blackberry bliss that measures 2″ x 3 3/4″ and adhere to card vertically
- Using the largest Framelit Die, die cut your velum and stamp sentiment directly onto it using the blackberry bliss ink pad
- Adhere carefully to banner panel
- Add organdy ribbon tied into a cute bow to finish off the front
Instructions (Inner Panel):
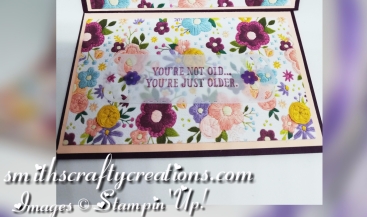
- Cut Petal Pink Carstock down to 2 1/2″ x 4″ and adhere to inside of card at bottom
- Cut your DSP down to 2 3/8″ x 3 7/8″ and adhere to petal pink section
- Using the relevant Framelit die, die cut your velum
- Choose greeting and stamp onto velum using blackberry blish ink pad
- Adhere to DSP centrally and add embellishments of choice – I used the gingham gala adhesive backed sequins 🙂 Very pretty!
Product List

|
||

|
||

|
||

|

|

|

|

|

 Designer Series Paper")


YouTube Tutorial
Thank you so much for visiting my blog today I really do appreciate each and every one of you for supporting me 🙂
If you have time, why not have a look at our current Stampin’ Up! promotions taking place at present, simply click on relevant images below.
Happy Crafting!
Love T x


Fancy becoming a business demonstrator or even a hobby demonstrator and receive great discounts on our products? Then why not join my team? We have a great joining offer on at present – sign up today for £99 and receive £71 of free product! Plus… not P&P costs. Simply click on the link below to find out how.. Send me an email via my contact page if you would like an informal chat.

